Intro
In the last installment we created an Ubuntu 18.04 LTS image to use to clone VMs from for spinning up our K8s nodes, we then cloned four VMs out, one as the master and three to be used as workers.
This time we are going to step through installing all the necessary K8s components on each of the nodes (kubeadm, kubectl and kubelet), the container runtime (Docker) and configuring the vSphere Cloud Provider for Kubernetes using kubeadm to bootstrap the cluster. We have a lot to cover, so let’s get to it!
Prerequisites
Tools
I am using macOS, so will be using the brew package manager to install and manage my tools, if you are using Linux or Windows, use the appropriate install guide for each tool, according to your OS.
For each tool I will list the brew install command and the link to the install instructions for other OSes.
- brew
- govc -
brew tap govmomi/tap/govc && brew install govmomi/tap/govc - kubectl -
brew install kubernetes-cli - tmux (optional) -
brew install tmux
Optional use of tmux
If you want to speed things up and type the same commands to multiple sessions at once (there is going to be a lot or repetition otherwise), use tmux to open a SSH session to each of the IP addresses for your VMs (for more info see here ↗)
tmux new\; split-window\; split-window\; split-window\; select-layout even-vertical
# Use ctrl b, then the arrow keys to cycle through the tmux panes and SSH to each box independently
ssh ubuntu@vm.ip.address.here
If you followed my tutuorial last time and all your boxes are named in the k8s* pattern, you can use the below command to get their IP addresses
govc find / -type m -name 'k8s*' | xargs govc vm.info | grep 'Name:\|IP'
Once you have SSH’d in to each box independently, you can turn on synchronisation
ctrl b, shift :, set synchronize-panes on
I did up a quick asciinema to illustrate setup and use ↗:
 ↗
↗Setting up VMs with K8s components
On all nodes
Install the container runtime (in our case Docker)
# Install Docker CE
# Update the apt package index
sudo apt update

## Install packages to allow apt to use a repository over HTTPS
sudo apt install ca-certificates software-properties-common apt-transport-https curl -y

## Add Docker’s official GPG key
curl -fsSL https://download.docker.com/linux/ubuntu/gpg | sudo apt-key add -

## Add docker apt repository.
sudo add-apt-repository \
"deb [arch=amd64] https://download.docker.com/linux/ubuntu \
$(lsb_release -cs) \
stable"

# Install docker ce (latest supported for K8s 1.13 is Docker 18.06)
sudo apt update && sudo apt install docker-ce=18.06.1~ce~3-0~ubuntu -y

# Setup daemon parameters, like log rotation and cgroups
sudo tee /etc/docker/daemon.json >/dev/null <<EOF
{
  "exec-opts": ["native.cgroupdriver=systemd"],
  "log-driver": "json-file",
  "log-opts": {
    "max-size": "100m"
  },
  "storage-driver": "overlay2"
}
EOF

sudo mkdir -p /etc/systemd/system/docker.service.d

# Restart docker.
sudo systemctl daemon-reload
sudo systemctl restart docker
Install the K8s components
# Add the K8s repo to apt
curl -s https://packages.cloud.google.com/apt/doc/apt-key.gpg | sudo apt-key add -
echo "deb https://apt.kubernetes.io/ kubernetes-xenial main" | sudo tee /etc/apt/sources.list.d/kubernetes.list >/dev/null

# Install kubelet, kubectl and kubeadm for cluster spinup
sudo apt update
sudo apt install kubelet kubeadm kubectl -y

# Hold K8s packages at their installed version so as not to upgrade unexpectedly on an apt upgrade
sudo apt-mark hold kubelet kubeadm kubectl
We will be using flannel ↗ for pod networking in this example, so the below needs to be run on all nodes to pass bridged IPv4 traffic to iptables chains ↗:
sudo sysctl net.bridge.bridge-nf-call-iptables=1
Enabling the VMware vSphere Cloud Provider
On the master(s)
Create your vsphere.conf file with vCenter details
Edit the below command to fill in your vCenter details before running.
If you don’t have a folder created with your kubernetes node VMs added we can do that quickly with govc (note, change vSAN-DC to your Datacenter name in vCenter):
govc folder.create /vSAN-DC/vm/k8s
govc object.mv /vSAN-DC/vm/k8s-\* /vSAN-DC/vm/k8s
Details on syntax can be found here ↗. It is important to note, whatever VM folder you specify below needs to be pre-created in your vCenter, in my case the folder is called k8s.
sudo tee /etc/kubernetes/vsphere.conf >/dev/null <<EOF
[Global]
user = "administrator@vsphere.local"
password = "Admin!23"
port = "443"
insecure-flag = "1"

[VirtualCenter "10.198.17.154"]
datacenters = "vSAN-DC"

[Workspace]
server = "10.198.17.154"
datacenter = "vSAN-DC"
default-datastore = "vsanDatastore"
resourcepool-path = "vSAN-Cluster/Resources"
folder = "k8s"

[Disk]
scsicontrollertype = pvscsi

[Network]
public-network = "VM Network"
EOF
Activate the vSphere Cloud Provider in our kubeadm init config file. Additionally, as we are deploying flannel as our overlay network for pods and it requires the below subnet CIDR in order for the overlay to work.
sudo tee /etc/kubernetes/kubeadminitmaster.yaml >/dev/null <<EOF
apiVersion: kubeadm.k8s.io/v1beta1
kind: InitConfiguration
bootstrapTokens:
       - groups:
         - system:bootstrappers:kubeadm:default-node-token
         token: y7yaev.9dvwxx6ny4ef8vlq
         ttl: 0s
         usages:
         - signing
         - authentication
nodeRegistration:
  kubeletExtraArgs:
    cloud-provider: "vsphere"
    cloud-config: "/etc/kubernetes/vsphere.conf"
---
apiVersion: kubeadm.k8s.io/v1beta1
kind: ClusterConfiguration
kubernetesVersion: v1.13.3
apiServer:
  extraArgs:
    cloud-provider: "vsphere"
    cloud-config: "/etc/kubernetes/vsphere.conf"
  extraVolumes:
  - name: cloud
    hostPath: "/etc/kubernetes/vsphere.conf"
    mountPath: "/etc/kubernetes/vsphere.conf"
controllerManager:
  extraArgs:
    cloud-provider: "vsphere"
    cloud-config: "/etc/kubernetes/vsphere.conf"
  extraVolumes:
  - name: cloud
    hostPath: "/etc/kubernetes/vsphere.conf"
    mountPath: "/etc/kubernetes/vsphere.conf"
networking:
  podSubnet: "10.244.0.0/16"
EOF
Restart the kubelet daemon to reload the configuration
sudo systemctl daemon-reload
sudo systemctl restart kubelet
Initialising the cluster with kubeadm
On all nodes
Firstly, verify that connectivity to the required gcr.io registries is working by pulling the containers required by kubeadm
$ sudo kubeadm config images pull
[config/images] Pulled k8s.gcr.io/kube-apiserver:v1.13.2
[config/images] Pulled k8s.gcr.io/kube-controller-manager:v1.13.2
[config/images] Pulled k8s.gcr.io/kube-scheduler:v1.13.2
[config/images] Pulled k8s.gcr.io/kube-proxy:v1.13.2
[config/images] Pulled k8s.gcr.io/pause:3.1
[config/images] Pulled k8s.gcr.io/etcd:3.2.24
[config/images] Pulled k8s.gcr.io/coredns:1.2.6
On the master node(s)
Initialise kubeadm with the config file from above which includes our vSphere Cloud Provider and Flannel CIDR configurations.
$ sudo kubeadm init --config /etc/kubernetes/kubeadminitmaster.yaml
[init] Using Kubernetes version: v1.13.0
[preflight] Running pre-flight checks
[preflight] Pulling images required for setting up a Kubernetes cluster
[preflight] This might take a minute or two, depending on the speed of your internet connection
[preflight] You can also perform this action in beforehand using 'kubeadm config images pull'
[kubelet-start] Writing kubelet environment file with flags to file "/var/lib/kubelet/kubeadm-flags.env"
[kubelet-start] Writing kubelet configuration to file "/var/lib/kubelet/config.yaml"
[kubelet-start] Activating the kubelet service
[certs] Using certificateDir folder "/etc/kubernetes/pki"
[certs] Generating "etcd/ca" certificate and key
[certs] Generating "etcd/peer" certificate and key
[certs] etcd/peer serving cert is signed for DNS names [k8s-master localhost] and IPs [10.198.17.177 127.0.0.1 ::1]
[certs] Generating "etcd/healthcheck-client" certificate and key
[certs] Generating "apiserver-etcd-client" certificate and key
[certs] Generating "etcd/server" certificate and key
[certs] etcd/server serving cert is signed for DNS names [k8s-master localhost] and IPs [10.198.17.177 127.0.0.1 ::1]
[certs] Generating "ca" certificate and key
[certs] Generating "apiserver" certificate and key
[certs] apiserver serving cert is signed for DNS names [k8s-master kubernetes kubernetes.default kubernetes.default.svc kubernetes.default.svc.cluster.local] and IPs [10.96.0.1 10.198.17.177]
[certs] Generating "apiserver-kubelet-client" certificate and key
[certs] Generating "front-proxy-ca" certificate and key
[certs] Generating "front-proxy-client" certificate and key
[certs] Generating "sa" key and public key
[kubeconfig] Using kubeconfig folder "/etc/kubernetes"
[kubeconfig] Writing "admin.conf" kubeconfig file
[kubeconfig] Writing "kubelet.conf" kubeconfig file
[kubeconfig] Writing "controller-manager.conf" kubeconfig file
[kubeconfig] Writing "scheduler.conf" kubeconfig file
[control-plane] Using manifest folder "/etc/kubernetes/manifests"
[control-plane] Creating static Pod manifest for "kube-apiserver"
[controlplane] Adding extra host path mount "cloud" to "kube-apiserver"
[controlplane] Adding extra host path mount "cloud" to "kube-controller-manager"
[control-plane] Creating static Pod manifest for "kube-controller-manager"
[controlplane] Adding extra host path mount "cloud" to "kube-apiserver"
[controlplane] Adding extra host path mount "cloud" to "kube-controller-manager"
[control-plane] Creating static Pod manifest for "kube-scheduler"
[controlplane] Adding extra host path mount "cloud" to "kube-apiserver"
[controlplane] Adding extra host path mount "cloud" to "kube-controller-manager"
[etcd] Creating static Pod manifest for local etcd in "/etc/kubernetes/manifests"
[wait-control-plane] Waiting for the kubelet to boot up the control plane as static Pods from directory "/etc/kubernetes/manifests". This can take up to 4m0s
[apiclient] All control plane components are healthy after 23.503056 seconds
[uploadconfig] storing the configuration used in ConfigMap "kubeadm-config" in the "kube-system" Namespace
[kubelet] Creating a ConfigMap "kubelet-config-1.13" in namespace kube-system with the configuration for the kubelets in the cluster
[patchnode] Uploading the CRI Socket information "/var/run/dockershim.sock" to the Node API object "k8s-master" as an annotation
[mark-control-plane] Marking the node k8s-master as control-plane by adding the label "node-role.kubernetes.io/master=''"
[mark-control-plane] Marking the node k8s-master as control-plane by adding the taints [node-role.kubernetes.io/master:NoSchedule]
[bootstrap-token] Using token: p8iv6v.zu8eofjtbc9r54dd
[bootstrap-token] Configuring bootstrap tokens, cluster-info ConfigMap, RBAC Roles
[bootstraptoken] configured RBAC rules to allow Node Bootstrap tokens to post CSRs in order for nodes to get long term certificate credentials
[bootstraptoken] configured RBAC rules to allow the csrapprover controller automatically approve CSRs from a Node Bootstrap Token
[bootstraptoken] configured RBAC rules to allow certificate rotation for all node client certificates in the cluster
[bootstraptoken] creating the "cluster-info" ConfigMap in the "kube-public" namespace
[addons] Applied essential addon: CoreDNS
[addons] Applied essential addon: kube-proxy

Your Kubernetes master has initialized successfully!

To start using your cluster, you need to run the following as a regular user:

  mkdir -p $HOME/.kube
  sudo cp -i /etc/kubernetes/admin.conf $HOME/.kube/config
  sudo chown $(id -u):$(id -g) $HOME/.kube/config

You should now deploy a pod network to the cluster.
Run "kubectl apply -f [podnetwork].yaml" with one of the options listed at:
  https://kubernetes.io/docs/concepts/cluster-administration/addons/

You can now join any number of machines by running the following on each node
as root:

  kubeadm join 10.198.17.177:6443 --token p8iv6v.zu8eofjtbc9r54dd --discovery-token-ca-cert-hash sha256:398f667fb3a6ffe6296e4d07c825834b54cce73bacf58641915cf79a1d1895f7
A lot of text will output as it spins up the cluster components, if all is successful, we can start using the cluster now by importing the kubeconfig.
mkdir -p $HOME/.kube
sudo cp -i /etc/kubernetes/admin.conf $HOME/.kube/config
sudo chown $(id -u):$(id -g) $HOME/.kube/config
You can also use it on external systems by copying the output from the below command into your local computer’s ~/.kube/config file:
sudo cat /etc/kubernetes/admin.conf
Let’s deploy our flannel pod overlay networking so the pods can communicate with each other.
kubectl apply -f https://raw.githubusercontent.com/coreos/flannel/bc79dd1505b0c8681ece4de4c0d86c5cd2643275/Documentation/kube-flannel.yml
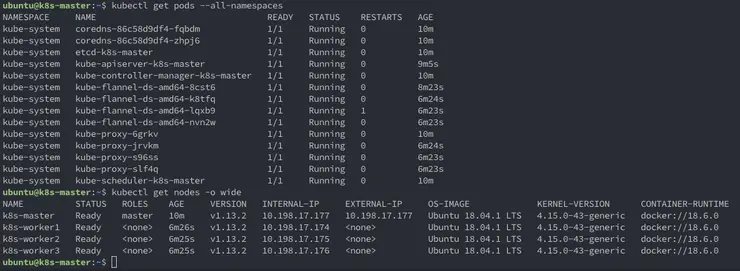
Check to make sure the pods are all in the status Running:
$ kubectl get pods --all-namespaces
NAMESPACE     NAME                                 READY   STATUS    RESTARTS   AGE
kube-system   coredns-86c58d9df4-fqbdm             1/1     Running   0          2m19s
kube-system   coredns-86c58d9df4-zhpj6             1/1     Running   0          2m19s
kube-system   etcd-k8s-master                      1/1     Running   0          2m37s
kube-system   kube-apiserver-k8s-master            1/1     Running   0          68s
kube-system   kube-controller-manager-k8s-master   1/1     Running   0          2m36s
kube-system   kube-flannel-ds-amd64-8cst6          1/1     Running   0          26s
kube-system   kube-proxy-6grkv                     1/1     Running   0          2m19s
kube-system   kube-scheduler-k8s-master            1/1     Running   0          2m36s
Export the master node config used to point the workers being joined to the master:
kubectl -n kube-public get configmap cluster-info -o jsonpath='{.data.kubeconfig}' > discovery.yaml
On your laptop
Copy the discovery.yaml to your local machine with scp.
scp ubuntu@10.198.17.177:~/discovery.yaml discovery.yaml
Then upload it to the worker nodes.
scp discovery.yaml ubuntu@10.198.17.189:~/discovery.yaml
scp discovery.yaml ubuntu@10.198.17.190:~/discovery.yaml
scp discovery.yaml ubuntu@10.198.17.191:~/discovery.yaml
On the worker nodes
To check and make sure the discovery.yaml file was copied correctly, do a quick cat.
cat ~/discovery.yaml
Then create the worker node kubeadm config yaml file (notice it’s using our discovery.yaml as the input for master discovery) and the token is the same as we put in the master kubeadminitmaster.yaml configuration above and we specify the cloud-provider as vsphere for the workers:
sudo tee /etc/kubernetes/kubeadminitworker.yaml >/dev/null <<EOF
apiVersion: kubeadm.k8s.io/v1alpha3
kind: JoinConfiguration
discoveryFile: discovery.yaml
token: y7yaev.9dvwxx6ny4ef8vlq
nodeRegistration:
  kubeletExtraArgs:
    cloud-provider: vsphere
EOF
And now we should be able to join our workers to the cluster.
$ sudo kubeadm join --config /etc/kubernetes/kubeadminitworker.yaml

[preflight] Running pre-flight checks
[discovery] Trying to connect to API Server "10.198.17.177:6443"
[discovery] Created cluster-info discovery client, requesting info from "https://10.198.17.177:6443"
[discovery] Requesting info from "https://10.198.17.177:6443" again to validate TLS against the pinned public key
[discovery] Cluster info signature and contents are valid and TLS certificate validates against pinned roots, will use API Server "10.198.17.177:6443"
[discovery] Successfully established connection with API Server "10.198.17.177:6443"
[join] Reading configuration from the cluster...
[join] FYI: You can look at this config file with 'kubectl -n kube-system get cm kubeadm-config -oyaml'
[kubelet] Downloading configuration for the kubelet from the "kubelet-config-1.13" ConfigMap in the kube-system namespace
[kubelet-start] Writing kubelet configuration to file "/var/lib/kubelet/config.yaml"
[kubelet-start] Writing kubelet environment file with flags to file "/var/lib/kubelet/kubeadm-flags.env"
[kubelet-start] Activating the kubelet service
[tlsbootstrap] Waiting for the kubelet to perform the TLS Bootstrap...
[patchnode] Uploading the CRI Socket information "/var/run/dockershim.sock" to the Node API object "k8s-worker1" as an annotation

This node has joined the cluster:
*Certificate signing request was sent to apiserver and a response was received.
* The Kubelet was informed of the new secure connection details.

Run 'kubectl get nodes' on the master to see this node join the cluster.
Verify setup
Now, as the output says above, back on the master check that all nodes have joined the cluster
ubuntu@k8s-master:~$ kubectl get nodes -o wide
NAME          STATUS   ROLES    AGE     VERSION   INTERNAL-IP     EXTERNAL-IP     OS-IMAGE             KERNEL-VERSION      CONTAINER-RUNTIME
k8s-master    Ready    master   4m44s   v1.13.2   10.198.17.177   10.198.17.177   Ubuntu 18.04.1 LTS   4.15.0-43-generic   docker://18.6.0
k8s-worker1   Ready    <none>   33s     v1.13.2   10.198.17.174   <none>          Ubuntu 18.04.1 LTS   4.15.0-43-generic   docker://18.6.0
k8s-worker2   Ready    <none>   32s     v1.13.2   10.198.17.175   <none>          Ubuntu 18.04.1 LTS   4.15.0-43-generic   docker://18.6.0
k8s-worker3   Ready    <none>   32s     v1.13.2   10.198.17.176   <none>          Ubuntu 18.04.1 LTS   4.15.0-43-generic   docker://18.6.0
Verify the providerID is set on all the nodes for the VCP to operate correctly:
ubuntu@k8s-master:~$ kubectl describe nodes | grep "ProviderID"
ProviderID:                  vsphere://420f0d85-cf4a-c7a7-e52d-18e9b4b71dec
ProviderID:                  vsphere://420fc2b2-64ab-a477-f7b1-37d4e6747abf
ProviderID:                  vsphere://420f2d75-37bd-8b56-4e2f-421cbcbbb0b2
ProviderID:                  vsphere://420f7ec3-2dbd-601e-240b-4ee6d8945210
We now have a fully up and running k8s cluster with the vSphere Cloud Provider installed! Check out part 3 where we install the K8s dashboard and show how the integration with the vSphere Cloud Provider really works!
Why not follow @mylesagray on Twitter ↗ for more like this!