Using the VCP
As of the last part in the series we have a fully up and running k8s cluster with the vSphere Cloud Provider installed! Let’s make sure it works and is provisioning storage for us by deploying a StorageClass and a test app.
Prerequisites
Tools
I am using macOS, so will be using the brew package manager to install and manage my tools, if you are using Linux or Windows, use the appropriate install guide for each tool, according to your OS.
For each tool I will list the brew install command and the link to the install instructions for other OSes.
- brew
- helm -
brew install kubernetes-helm - kubectl -
brew install kubernetes-cli
vCenter
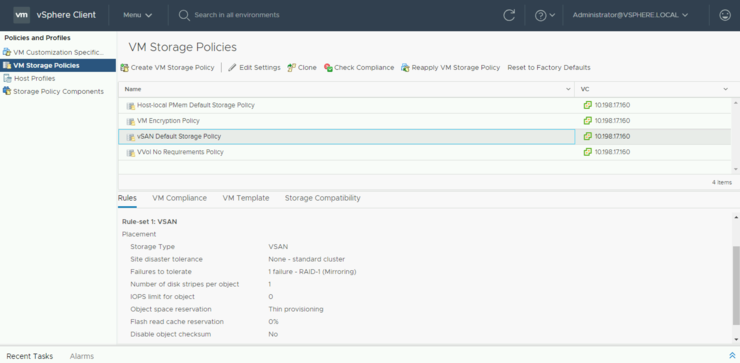
In vCenter you should already have a Storage Policy created for whatever datastore(s) you are using, this can be with richer policy primitives ↗ when using vSAN (things like RAID method, numbers of replicas, etc) or if using standard NFS/VMFS datastores, tag-based placement ↗ works as well.
I am using the “vSAN Default Storage Policy” as below, which does what it says on the tin, is a default policy that infers RAID-1 mirroring and single failure tolerance.
Kubernetes
Put the below into a new yaml file (i’m calling mine vsan-default-storage-policy.yaml) - it will create a new StorageClass in k8s called vsan-default that maps to the vSAN SPBM policy vSAN Default Storage Policy.
Note the annotation storageclass.kubernetes.io/is-default-class: "true" means that anything deployed that requires a PersistentVolume that doesn’t specify a StorageClass will use this one as its fallback. In other words, it’s the catch-all.
kind: StorageClass
apiVersion: storage.k8s.io/v1
metadata:
  name: vsan-default
  annotations:
    storageclass.kubernetes.io/is-default-class: "true"
provisioner: kubernetes.io/vsphere-volume
parameters:
    storagePolicyName: "vSAN Default Storage Policy"
    datastore: vsanDatastore
Apply it to the cluster:
kubectl create -f vsan-default-storage-policy.yaml
Let’s deploy a stateful app to test it with, for this to keep things simple, we will use helm (think of it as an application manager, for K8s). Be aware this installation style for helm (granting the tiller pod cluster-admin privileges) is a big security no-no ↗ and is just for ease of setup here. For more information on why this is bad, look here ↗, and please don’t do this on a production cluster.
In this case, it is a throwaway cluster for me, so I will be using these permissions. First create the RBAC role and permissions for the helm service account in another new file called helm-rbac.yaml:
apiVersion: v1
kind: ServiceAccount
metadata:
  name: tiller
  namespace: kube-system
---
apiVersion: rbac.authorization.k8s.io/v1
kind: ClusterRoleBinding
metadata:
  name: tiller
roleRef:
  apiGroup: rbac.authorization.k8s.io
  kind: ClusterRole
  name: cluster-admin
subjects:
  - kind: ServiceAccount
    name: tiller
    namespace: kube-system
Apply the role to the cluster:
$ kubectl create -f helm-rbac.yaml
serviceaccount/tiller created
clusterrolebinding.rbac.authorization.k8s.io/tiller created
Let’s install helm onto the cluster with the service account we provisioned:
$ helm init --service-account tiller
$HELM_HOME has been configured at /Users/mylesgray/.helm.

Tiller (the Helm server-side component) has been installed into your Kubernetes Cluster.

Please note: by default, Tiller is deployed with an insecure 'allow unauthenticated users' policy.
To prevent this, run `helm init` with the --tiller-tls-verify flag.
For more information on securing your installation see: https://docs.helm.sh/using_helm/#securing-your-helm-installation
Happy Helming!
And update helm from the chart repositories
$ helm repo update
Hang tight while we grab the latest from your chart repositories...
...Skip local chart repository
...Successfully got an update from the "incubator" chart repository
...Successfully got an update from the "istio.io" chart repository
...Successfully got an update from the "gitlab" chart repository
...Successfully got an update from the "openfaas" chart repository
...Successfully got an update from the "stable" chart repository
Update Complete. ⎈ Happy Helming!⎈
At last, let’s deploy the chart for mongodb to test our installation (which will use our default StorageClass we just created)
$ helm install --name test-mongodb stable/mongodb

NAME:   test-mongodb
LAST DEPLOYED: Sat Jan 26 20:54:53 2019
NAMESPACE: default
STATUS: DEPLOYED

RESOURCES:
==> v1/Secret
NAME          TYPE    DATA  AGE
test-mongodb  Opaque  1     2s

==> v1/PersistentVolumeClaim
NAME          STATUS   VOLUME        CAPACITY  ACCESS MODES  STORAGECLASS  AGE
test-mongodb  Pending  vsan-default  2s

==> v1/Service
NAME          TYPE       CLUSTER-IP     EXTERNAL-IP  PORT(S)    AGE
test-mongodb  ClusterIP  10.98.144.241  <none>       27017/TCP  2s

==> v1beta1/Deployment
NAME          DESIRED  CURRENT  UP-TO-DATE  AVAILABLE  AGE
test-mongodb  1        1        1           0          2s

==> v1/Pod(related)
NAME                           READY  STATUS   RESTARTS  AGE
test-mongodb-646b949fd4-xjxdb  0/1    Pending  0         2s


NOTES:


** Please be patient while the chart is being deployed **

MongoDB can be accessed via port 27017 on the following DNS name from within your cluster:

    test-mongodb.default.svc.cluster.local

To get the root password run:

    export MONGODB_ROOT_PASSWORD=$(kubectl get secret --namespace default test-mongodb -o jsonpath="{.data.mongodb-root-password}" | base64 --decode)

To connect to your database run the following command:

    kubectl run --namespace default test-mongodb-client --rm --tty -i --restart='Never' --image bitnami/mongodb --command -- mongo admin --host test-mongodb --authenticationDatabase admin -u root -p $MONGODB_ROOT_PASSWORD

To connect to your database from outside the cluster execute the following commands:

    kubectl port-forward --namespace default svc/test-mongodb 27017:27017 &
    mongo --host 127.0.0.1 --authenticationDatabase admin -p $MONGODB_ROOT_PASSWORD
Check to make sure the PersistentVolume and PersistentVolumeClaim deployed successfully, they should show a status of Bound if they have. (You may need to run this a few times while the volume provisions and gets mounted)
$ kubectl get pv,pvc
NAME                                                        CAPACITY   ACCESS MODES   RECLAIM POLICY   STATUS   CLAIM                  STORAGECLASS   REASON   AGE
persistentvolume/pvc-64941983-21b5-11e9-b851-005056b9750f   8Gi        RWO            Delete           Bound    default/test-mongodb   vsan-default            63m

NAME                                 STATUS   VOLUME                                     CAPACITY   ACCESS MODES   STORAGECLASS   AGE
persistentvolumeclaim/test-mongodb   Bound    pvc-64941983-21b5-11e9-b851-005056b9750f   8Gi        RWO            vsan-default   63m
Monitor the app’s deployment and wait for all items to show as Running
$ kubectl get all
NAME                                READY   STATUS    RESTARTS   AGE
pod/test-mongodb-646b949fd4-cz65g   1/1     Running   0          62m

NAME                   TYPE        CLUSTER-IP      EXTERNAL-IP   PORT(S)     AGE
service/kubernetes     ClusterIP   10.96.0.1       <none>        443/TCP     3h20m
service/test-mongodb   ClusterIP   10.97.102.136   <none>        27017/TCP   62m

NAME                           READY   UP-TO-DATE   AVAILABLE   AGE
deployment.apps/test-mongodb   1/1     1            1           62m

NAME                                      DESIRED   CURRENT   READY   AGE
replicaset.apps/test-mongodb-646b949fd4   1         1         1       62m
Verify the app works by testing access from the master node by spinning up a client container
# Export the password set during deployment
export MONGODB_ROOT_PASSWORD=$(kubectl get secret --namespace default test-mongodb -o jsonpath="{.data.mongodb-root-password}" | base64 --decode)

# Connect a client container to your server container
kubectl run --namespace default test-mongodb-client --rm --tty -i --restart='Never' --image bitnami/mongodb --command -- mongo admin --host test-mongodb --authenticationDatabase admin -u root -p $MONGODB_ROOT_PASSWORD

# Show databases
> show dbs
admin   0.000GB
config  0.000GB
local   0.000GB

> exit
At this stage it is worth installing the kubernetes dashboard as well, for some visibility.
kubectl apply -f https://raw.githubusercontent.com/kubernetes/dashboard/v1.10.1/src/deploy/recommended/kubernetes-dashboard.yaml
Create a user (ServiceAccount) for accessing the UI with a new yaml file called ui-user.yaml (as you can see, I called mine myles)
apiVersion: v1
kind: ServiceAccount
metadata:
  name: myles
  namespace: kube-system
Create a cluster-role for the user (myles) such that is has cluster-admin privileges - my file is called clusterrolebinding.yaml
apiVersion: rbac.authorization.k8s.io/v1
kind: ClusterRoleBinding
metadata:
  name: myles
roleRef:
  apiGroup: rbac.authorization.k8s.io
  kind: ClusterRole
  name: cluster-admin
subjects:
- kind: ServiceAccount
  name: myles
  namespace: kube-system
Import both configs into K8s
kubectl create -f ui-user.yaml
kubectl create -f clusterrolebinding.yaml
Notice, we didn’t create a password - they are generated automatically by K8S, so let’s get the access token for the user we just created (change the grep section from myles in the command to reflect the username you used in ui-user.yaml above) - you will need to copy and paste the token: output from the command.
$ kubectl -n kube-system describe secret $(kubectl -n kube-system get secret | grep myles | awk '{print $1}')
Name:         myles-token-2mkr6
Namespace:    kube-system
Labels:       <none>
Annotations:  kubernetes.io/service-account.name: myles
              kubernetes.io/service-account.uid: 95920d01-21c9-11e9-b851-005056b9750f

Type:  kubernetes.io/service-account-token

Data
====
token:      eyJhbGciOiJSUzI1NiIsImtpZCI6IiJ9.eyJpc3MiOiJrdWJlcm5ldGVzL3NlcnZpY2VhY2NvdW50Iiwia3ViZXJuZXRlcy5pby9zZXJ2aWNlYWNjb3VudC9uYW1lc3BhY2UiOiJrdWJlLXN5c3RlbSIsImt1YmVybmV0ZXMuaW8vc2VydmljZWFjY291bnQvc2VjcmV0Lm5hbWUiOiJteWxlcy10b2tlbi0ybWtyNiIsImt1YmVybmV0ZXMuaW8vc2VydmljZWFjY291bnQvc2VydmljZS1hY2NvdW50Lm5hbWUiOiJteWxlcyIsImt1YmVybmV0ZXMuaW8vc2VydmljZWFjY291bnQvc2VydmljZS1hY2NvdW50LnVpZCI6Ijk1OTIwZDAxLTIxYzktMTFlOS1iODUxLTAwNTA1NmI5NzUwZiIsInN1YiI6InN5c3RlbTpzZXJ2aWNlYWNjb3VudDprdWJlLXN5c3RlbTpteWxlcyJ9.YzVRG6Dt_p4_r7Uc7tCAEXjRG8xaB5HqeSO9DdcaXQWf6mqGhH2ahiXI3XdkqOm2725NHEJUsErD8GrJpGYnL_od15Zvxhn1D4VZr3Q3ds-nJ0IK2KS_ArXj3bypO6sjAEBb7bXviuWxge0bLlkurnuLYQSa9lrijHe95AGJnNrDi66Dr1eQoE4deJrjX7Bxm6ef2tikl6lCRA69Q57glQFBQm2aIvOUvR3y5b16vIVMQ6dJcnSE1EjB-G0n0lLRUzPij2nNU7IvmUBEzIbY2jFBxYiY8PEi0sMB2MZSitnW7DbMlZ5Yb8anHsX2XJbixl-VoDkMJuyujzwIc6vs8Q
ca.crt:     1025 bytes
namespace:  11 bytes
Create a proxy session to K8s to access the UI - note: by default, the dashboard is not accessible external to the cluster more detail on how to do that here ↗
kubectl proxy &
Then access the dashboard (details on how to authenticate are available here ↗):
open http://localhost:8001/api/v1/namespaces/kube-system/services/https:kubernetes-dashboard:/proxy/
Change the access mode to token and paste in the output we copied above, profit
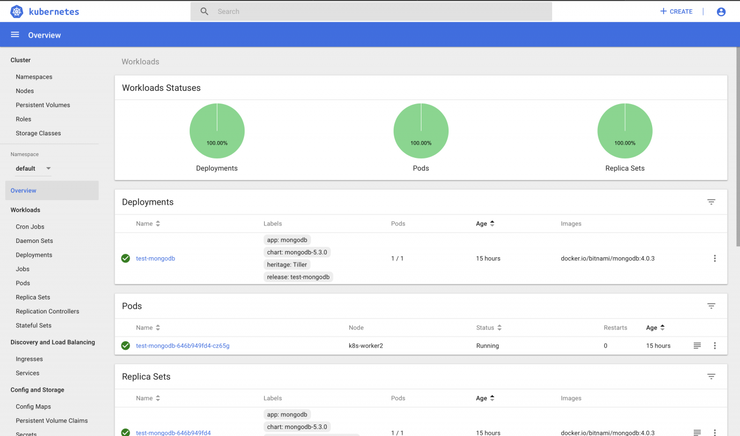
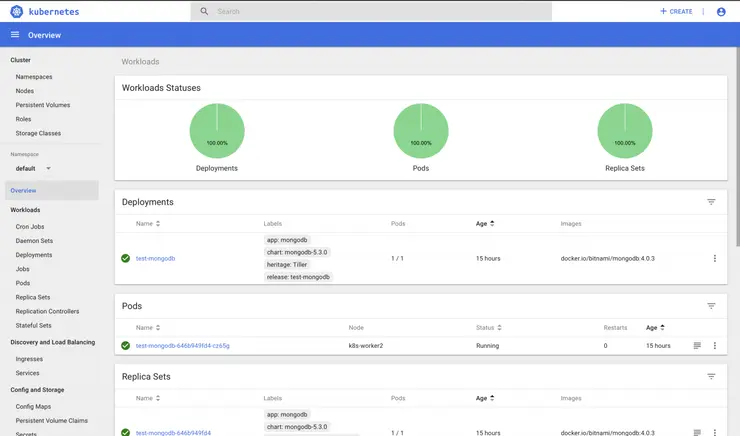
At this point you can browse around the K8s dashboard, view the ReplicaSet that helm created for mongodb, view the PersistentVolume created for us automatically from the StorageClass we defined and a lot more.
Feel free to have a look around, dive back into helm and deploy some ↗ more ↗ apps ↗!
Why not follow @mylesagray on Twitter ↗ for more like this!