Introduction
Google recently announced that it was getting rid of the legacy free tier ↗ for Google Apps/Workspace accounts, a service I’ve used for 10+ years. I don’t appreciate it when free tiers (of anything) get switched into paid tiers by holding your data ransom through inconvenience of migration, so I started looking at alternatives.
I am heavily embedded in the Apple ecosystem, my phone, tablets, laptops, home automation system, everything really lives within the walled garden to some extent - for better or worse. I already pay for iCloud+ and I leared recently it allows custom domains ↗, and as pointed out by Sam here ↗ the old + trick in an email address still works with iCloud as well, so why not give it a shot?
There are a few things to be aware of here, you can indeed pull all your emails from Gmail and put them manually into folders in a mail client - but who wants to do that? So we can automate it - but at the end, you want to cancel the Google Workspaces subscription, which means all those paid services go away, so make sure all of your emails, calendars, drive contents, etc are backed up or moved before you do.
Additionally, as far as I can tell there is no way to delete all of the services associated with your Google Workspaces account without deleting the entire account - meaning all those logins you’ve created with that Google account are lost if you want to go that far - personally, I have been wanting to reduce my reliance on Google’s SSO for some time now, so I may look at doing that in the near future as well.
The Tooling
There are a number of ways of migrating emails from Gmail to iCloud, but most involve a client mail app for download and upload and rely on manual mapping of folders amongst other things. I wanted a headless service that I could plug in credentials and have it do the work for me, so I decided upon imapsync ↗ which is a long esablished tool dating from the 90’s and is still actively maintained.
Personally, I like to run things inside docker, just for cleanliness - and there is indeed an official imapsync Docker container ↗, and helpfully it takes the exact same commands as the binary release for input.
Additionally, you need a little more work to make the switch - if you use 2FA everywhere (and you do, right?) then you’ll need an app-specific password for Google ↗ and for Apple ↗ for imapsync to do the business.
We’ll also need our DNS provider details in order to switch over the MX, TXT and any DKIM/DMARC records you might have from Google to iCloud as well.
The Process
Account Setup
First up, you need to create an iCloud account and email if you don’t already have one - I did, but in the off chance you dont, then go ahead and create one. This is the account that we will attach our custom domains to (I had three domains, and accounts I was migrating to a single mailbox).
Run through the iCloud custom domain setup ↗ process to add and verify your target domain, up to step 2 - we need to keep the DNS records in-tact until we have completed our migration.
Setup Email Forwarding
Not strictly neccessary, but I set up email forwarding ↗ on my target Gmail account to the iCloud acccount’s address - imapsync will make sure to dedupe anything, and can actually be run multiple times to make up for deltas - but the forwarding means that you can make a single pass with imapsync and then flip your MX records and lose no emails.
Running imapsync
I chose to run the imapsync container in daemon mode on a NAS that I have running, just so it could run for days (and it will take days) without having to leave my computer on the whole time or worry about SSH sessions, etc timing out.
imapsync has a number for parameters specifically for some email providers, like --gmail1 and --gmail2 which are essentially composites of a whole bunch of other parameters but optimised to work with that particular service - as an example, to ensure you don’t hit Gmail’s rate limiting, to do folder mapping and set headers it automatically enables the following switches:
--host1 imap.gmail.com \
--ssl1 \
--host2 imap.gmail.com \
--ssl2 \
--maxbytespersecond 20_000 \
--maxbytesafter 1_000_000_000 \
--automap \
--maxsleep 2 \
--useheader X-Gmail-Received --useheader Message-Id \
--synclabels \
--resynclabels \
--exclude "\[Gmail\]$" \
--folderlast  "[Gmail]/All Mail"
That greatly simplifies the config we need to use. iCloud doesn’t have any such composite in imapsync so we have to manually specify that we want SSL and the IMAP server name, aside from that it seems to work great out of the box.
I recommend running the command with the --justlogin flag to ensure everything is working before we commit to the actual copy job:
docker run gilleslamiral/imapsync imapsync --justlogin --errorsmax 200 --user1 {gmail-email-address} --password1 {app-specific-password-for-gmail} --host2 imap.mail.me.com --ssl2 --user2 {icloud-email-address} --password2 {app-specific-password-for-icloud} --gmail1
The command I used in the end looked like this:
docker run gilleslamiral/imapsync imapsync --errorsmax 200 --user1 {gmail-email-address} --password1 {app-specific-password-for-gmail} --host2 imap.mail.me.com --ssl2 --user2 {icloud-email-address} --password2 {app-specific-password-for-icloud} --gmail1
You’ll notice a few things there, we specify --errorsmax 200 as I found when syncing “Chats” it would error out, and I dont care about them - so I ignored the errors. We also specify --gmail1 to ensure we’re using the gmail composite set of commands as in the above example to make sure we don’t get rate limited, etc.
It’s all working if you see the below in the output:
Host1: success login on [imap.gmail.com] with user [email@your-google-domain.com] auth [LOGIN] or [LOGIN]
Host2: success login on [imap.mail.me.com] with user [your-email-here@icloud.com] auth [LOGIN] or [LOGIN]
Host1: state Authenticated
Host2: state Authenticated
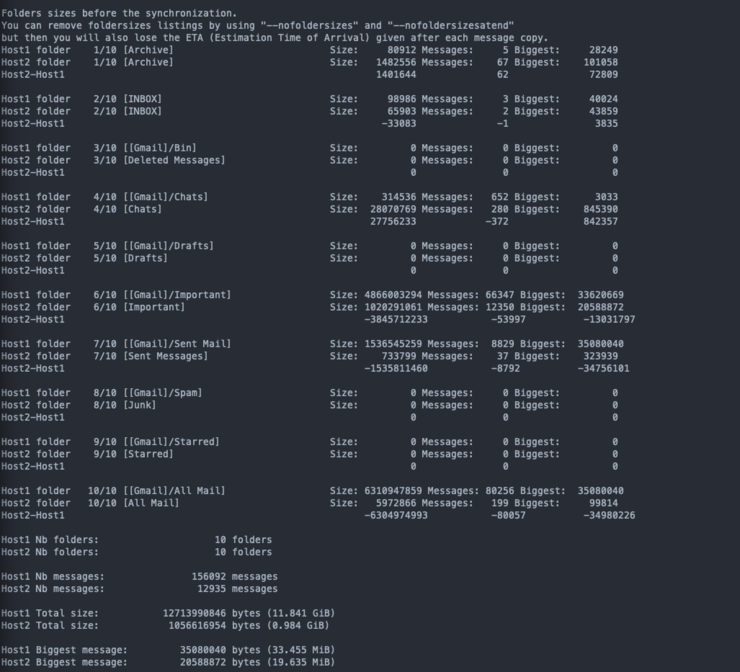
And now, you wait - for me this took about three days to do 150k emails at about 12GB total size, due to the rate limiting - so around 1 email per second, or so - so strap in. When it’s all done, you can run it again, or if you set up email forwarding from Gmail earlier, you can just run it once and it’ll do the job.
Flipping DNS
With all of your emails synced, you can now change the MX, CNAME for DKIM and TXT records for SPF and verification on your domain to point to the addresses that Apple will have emailed to you as part of your iCloud Custom Domain verification process.
Apple have a nice process document ↗ for this, and it varies by DNS provider - so I won’t replicate it here.
One thing I will mention, however, is that they don’t call out DMARC records - But I can confirm that they do indeed work, I use CloudFlare for my DNS zone hosting and they have a great DMARC record wizard, but the TL;DR is this:
Type   |   Name   |         Value         |   TTL
TXT    |  _dmarc  |  v=DMARC1; p=reject;  |  Auto
If you want the receiving side to instead mark any unauthenticated email as spam, change the value to p=quarantine;.
Wrap Up
At this stage, your old emails are all inside iCloud, and new emails can be sent and received from your custom domain. The next step would be to transfer your calendars, contacts and notes (as they’re not stored in IMAP) using Google Takeout ↗ and import them into your new service ↗ - for me, just iCloud again.
Finally cancel your workspace subscription (which will immediately revoke access to paid for services).
An extra optional step as I mentioned at the very start is to delete all the services, be deleting the workspace, which means you lose access to the account, that’s a bit of a mess - so i’m going to leave it for another day.
For more like this, why not follow Myles on Twitter ↗?