Out of morbid curiosity (and lack of IPv4 public address space available to me), I decided I wanted to enable IPv6 in my lab. However, before taking the plunge there, I would try it out on my residential ADSL line, I use the same brand of firewall there as in my lab so the experience should be largely transferable.
So for a bit of context; I have a Zen Internet ADSL line (I saw the fiber van around the cabinet recently so maybe that will change) - auth to the provider is done via PPPoE on IPv4.
I had a hell of a time getting this working. Otherwise, it would not be a blog post, so let’s get right into the config snippets.
I am going to assume you have your IPv4 internet line already configured with PPPoE and that it is working, so all we do here is retrofit the IPv6 portion. Zen send you an email with your IPv6 details for your account like the below:
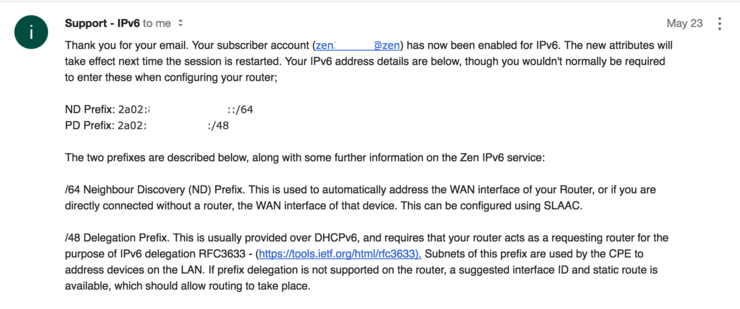
You only care about the PD Prefix portion as the ND Prefix portion is issued to your WAN interface automatically by SLAAC once you set address mode to PPPoE.
Log into your Fortigate with SSH and enter the vdom context you are using then edit the WAN interface:
config system interface
    edit "wan1"
        config ipv6
            set ip6-mode pppoe
            set ip6-allowaccess ping
            set dhcp6-prefix-delegation enable
            set dhcp6-prefix-hint 2a02:xxxx:yyyy::/48
            set autoconf enable
        end
    next
end
A breakdown of the above:
set ipv6-mode pppoe- Tells the unit to grab an address via pppoe (this is issued automatically and is within theND Prefixfrom the email).set ip6-allowaccess ping- Simply, allow ping access on WAN.set dhcp6-prefix-delegation enable- This tells the Fortigate to accept DHCPv6 prefix delegation (essentially how IPv6 addresses are issued by ISPs to non-edge devices).set dhcp6-prefix-hint 2a02:xxxx:yyyy::/48- This is thePD Prefixfrom the email/issued by your providerset autoconf enable- Allow configuration of interface address automatically via SLAAC
Next up we need to take care of the LAN side, this is where the majority of the problems I had laid, mainly because I was blindly copying the Fortigate documentation without thinking about what the parameters did.
config system interface
    edit "internal"
        config ipv6
            set ip6-mode delegated
            set ip6-allowaccess ping https ssh snmp
            set ip6-send-adv enable
            set ip6-manage-flag enable
            set ip6-upstream-interface "wan1"
            set ip6-subnet ::1/64
            config ip6-delegated-prefix-list
                edit 1
                    set upstream-interface "wan1"
                    set autonomous-flag enable
                    set onlink-flag enable
                    set subnet ::/64
                next
            end
        end
    next
end
Again, a breakdown of the above (note none of the LAN config has been nulled, it works as-is):
set ip6-mode delegated- Tells the interface to get its IP via protocol delegationset ip6-allowaccess ping https ssh snmp- Allows access to the firewall via these protocolsset ip6-send-adv enable- Allow IPv6 routing advertisements ↗ to be sent from this interface.set ip6-manage-flag enable- Required to tell end devices to receive IPv6 addresses via DHCPv6 and not SLAAC (more info ↗)set ip6-upstream-interface "wan1"- This informs the Fortigate from what interface it should have its address delegatedset ip6-subnet ::1/64- Tells the interface to take the first address in the delegated/64
We then need to configure a delegated prefix list - this is used to hand out addresses via DHCPv6 on this interface:
config ip6-delegated-prefix-list- Enter context commandedit 1- You can have multiple prefix lists, but we just use one hereset upstream-interface "wan1"- As above, tells the list where to have its addresses delegated fromset autonomous-flag enable- Allows clients to construct their global IPv6 address ↗ from their 64-bit interface identifier with the prefix scope provided in the RAset onlink-flag enable- Treat the prefix in the RA as “on-link”/L2 connected ↗ (typically only link-localFE80addresses)set subnet ::/64- Use the first/64in the/48prefix for address allocation
Now that we have the interfaces set up we need to configure our DHCPv6 server:
config system dhcp6 server
    edit 1
        set interface "internal"
        set upstream-interface "wan1"
        set ip-mode delegated
        set dns-server1 2001:4860:4860::8888
        set dns-server2 2001:4860:4860::8844
    next
end
A line-by-line breakdown is unnecessary at this stage. Firstly, we enter the dhcp6 server context and create a single entry, we tell the DHCP server to listen on the internal interface and to use wan1 as it is upstream interface for addresses and to operate in delegated mode as in the other config portions.
The only real difference here is the DNS servers; I have the Fortigate advertise the Google IPv6 DNS servers with the DHCP advertisements it sends.
You now need to reboot your firewall (I am not joking, seriously, it does not work otherwise).
A little testing to see what’s happening (note: the only interfaces we care about getting global IPv6 addresses are ppp1 and internal):
# diag ipv6 address list

dev=18 devname=internal flag=P scope=0 prefix=64 addr=2a02:xxxx:yyyy::1
dev=23 devname=ppp1 flag= scope=0 prefix=64 addr=2a02:wwww:zzzz:aaa::1 preferred=1736 valid=17936
The ppp1 interface should have an address from the ND Prefix given to you by your provider - this is, as mentioned before, completely automatic.
The internal interface should have an address from the PD Prefix given to you by the provider - as you can see above it has the first interface in the /64 as we defined in the config; addr=2a02:xxxx:yyyy::1.
A quick ping6 to Google:
# exec ping6 ipv6.google.com

PING ipv6.google.com(2a00:1450:4009:811::200e) 56 data bytes
64 bytes from 2a00:1450:4009:811::200e: icmp_seq=1 ttl=58 time=20.9 ms
64 bytes from 2a00:1450:4009:811::200e: icmp_seq=2 ttl=58 time=21.0 ms
64 bytes from 2a00:1450:4009:811::200e: icmp_seq=3 ttl=58 time=21.2 ms
64 bytes from 2a00:1450:4009:811::200e: icmp_seq=4 ttl=58 time=21.1 ms
64 bytes from 2a00:1450:4009:811::200e: icmp_seq=5 ttl=58 time=21.7 ms

--- ipv6.google.com ping statistics ---
5 packets transmitted, 5 packets received, 0% packet loss, time 4038ms
rtt min/avg/max/mdev = 20.968/21.234/21.777/0.317 ms
Now configure some firewall policies remember IPv6 requires no NAT at all, ever. I am enabling all traffic outbound and all ICMPv6 inbound:
config firewall policy6
    edit 1
        set name "Default out"
        set srcintf "internal"
        set dstintf "wan1"
        set srcaddr "all"
        set dstaddr "all"
        set action accept
        set schedule "always"
        set service "ALL"
        set logtraffic all
    next
    edit 2
        set name "Allow ICMP in"
        set srcintf "wan1"
        set dstintf "internal"
        set srcaddr "all"
        set dstaddr "all"
        set action accept
        set schedule "always"
        set service "ALL_ICMP6"
        set logtraffic all
    next
end
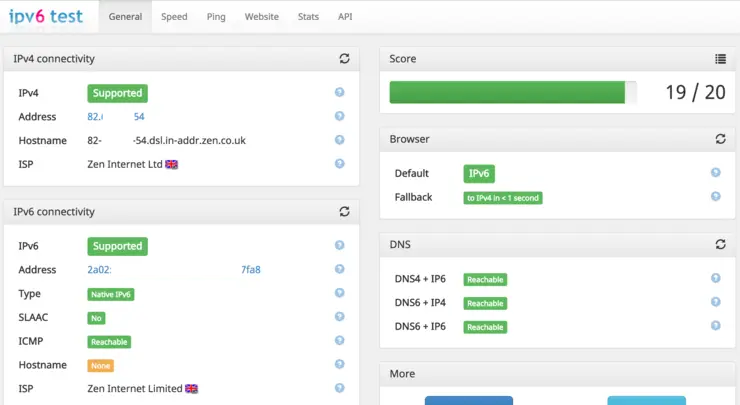
All good! Now you should be able to access ipv6-test.com ↗ from your browser and have all tests pass, and you see your local computer’s IPv6 address.
Just for giggles, I set up blah.cloud as dual-stack, so a quick dig command from our local workstation:
myles.gray$ dig @2001:4860:4860::8888 blah.cloud AAAA

; <<>> DiG 9.8.3-P1 <<>> @2001:4860:4860::8888 blah.cloud AAAA
; (1 server found)
;; global options: +cmd
;; Got answer:
;; ->>HEADER<<- opcode: QUERY, status: NOERROR, id: 52567
;; flags: qr rd ra; QUERY: 1, ANSWER: 2, AUTHORITY: 0, ADDITIONAL: 0

;; QUESTION SECTION:
;blah.cloud.            IN  AAAA

;; ANSWER SECTION:
blah.cloud.     119 IN  AAAA    2400:cb00:2048:1::6819:f124
blah.cloud.     119 IN  AAAA    2400:cb00:2048:1::6819:f224

;; Query time: 48 msec
;; SERVER: 2001:4860:4860::8888#53(2001:4860:4860::8888)
;; WHEN: Sun Jun 18 17:17:16 2017
;; MSG SIZE  rcvd: 84
There we have it a fully operational IPv6 implementation with prefix delegation on Fortigate.
Why not follow @mylesagray on Twitter ↗ for more like this!