My lab is not what you’d call typical in any way, a kit list will i’m sure come up in a future post, but I have what is analogous to a “primary” DC and a “backup” DC with regard to physical premises. The problem is, I live in the secondary with other human beings, meaning power draw and noise are to be kept to a minimum.
I also don’t have the luxury of having a /29 of public addresses at the second site, or even a static address at all.
However, I still want to be able to VPN/SSH in while i’m not there, so I needed something low-power, cheap, quiet, but quick enough to do a few things:
- Run OpenVPN
- Run some kind of DynamicDNS solution
- Be on all the time with minimal power draw
- Not replace my standard Virgin Media modem/router combo
A few things went through my head and it dawned on my I had bought a few Raspberry Pi 3’s for use in various projects - This was definitely a “goer”.
So to get started my requirements list is actually quite minimal;
- Raspberry Pi 3 (2 will likely be fast enough also)
- Ethernet cable/Wifi
- Power
- SD Card (64GB)
- KVM of some kind
Let’s get cracking then, this article will focus on the dynamic DNS implementation, plenty of tutorials out there for OpenVPN.
The first step is to download NOOBS ↗ (I use lite-for network install) and burn it to your Pi’s SD card, I use an application for OSX called ApplePi-Baker ↗, it makes the process of formatting and making bootable very simple. Plug in your SD card to your computer, select from the list and click Prep for NOOBS and click OK because we’re a bunch of pros…

Extract the NOOBS zip file and copy/paste all contents into the root of the SD card.

Then eject the disk, plug it into your Pi (you always safe-eject right? ↗).

Hook up whatever you are using for KVM and connectivity and get NOOBS to install Raspbian for you - if you need a guide, here ↗.

Now that Raspbian is installed, we are going to SSH into the Pi so we can work on it remotely: ssh pi@your.ip.address.here and the password is raspberry. Now we can get down to business.
First up I wanted to get the Cloudflare portion sorted - if you haven’t got Cloudflare as your DNS provider, i’d need to ask why then tell you to sign up. They offer a slew of services from CDN, Anti-DDoS, Always-On for free and offer an API as standard ↗ to add/remove/update your DNS rules (see where i’m going with this?).
Sign in to your Cloudflare account and go to my account ↗, scroll down to the API key section and record your Global API Key we will need this soon.
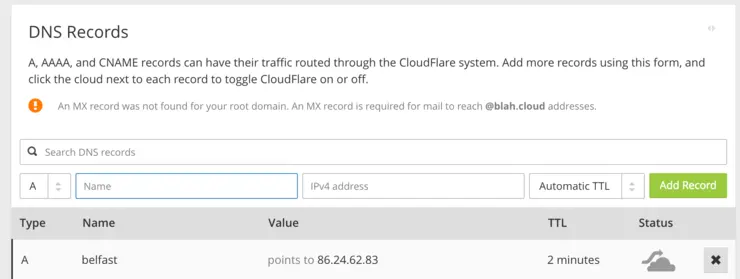
Go back to your zone and add an A-record for your current public IP (or any IP, it’s going to be programatically set anyway), for mine I have just used belfast.

Next up, on the Pi sudo bash into root and as it goes, someone has already done it (and most likely better) so, I forked it, fixed a small bug and set the TTL to 2 minutes. You can just wget the file into a shell script:
wget https://gist.githubusercontent.com/MylesGray/b6b3b9b6b373de6a90e1f2132cccfade/raw/abda700b0dd5a4eb68c64727b1c2a98da284891b/cf-ddns.sh /usr/local/bin/cf-ddns.sh
Make it executable:
chmod +x /usr/local/bin/cf-ddns.sh
Next we are going to set up the params inside the file:
nano /usr/local/bin/cf-ddns.sh
And fill in the following params and save the file:
# API key, see https://www.cloudflare.com/a/account/my-account,
# incorrect api-key results in E_UNAUTH error
CFKEY=

# Zone name, will list all possible if missing, eg: example.com
CFZONE=

# Username, eg: user@example.com
CFUSER=

# Hostname to update, eg: homeserver.example.com
CFHOST=
Now we can run it and check that it works (if not, fix what it complains about or go up and re-check your steps):
/usr/local/bin/cf-ddns.sh
Hopefully you see something like this:
root@raspberrypi:/home/pi# /usr/local/bin/cf-ddns.sh
Missing DNS record ID
fetching from Cloudflare...
 => Found CFID=********* , advising to save this to /usr/local/bin/cf-ddns.sh or set it using the -i flag
Updating DNS to your.public.ip.address
Updated succesfuly!
You can verify this in the Cloudflare portal of course. Now let’s make it automatic edit the crontab with your editor of choice:
crontab -e
I wanted mine to run every 2 minutes:
*/2 * * * * /usr/local/bin/cf-ddns.sh >/dev/null 2>&1
Anything running into OpenVPN setup and router forwarding is too situationally specific so i’m going to leave it here for now, hope this helps with whatever your use case may be!
Why not follow @mylesagray on Twitter ↗ for more like this!
