Intro
I have been experimenting a lot over the past 18 months with containers and in particular, Kubernetes, and one of the core things I always seemed to get hung up on was part-zero - creating the VMs to actually run K8s. I wanted a CLI only way to build a VM template for the OS and then deploy that to the cluster.
It turns out that with Ubuntu 18.04 LTS (in particular the cloud image OVA) there are a few things need changed from the base install (namely cloud-init) in order to make them play nice with OS Guest Customisation in vCenter.
This post is a guide through making those changes.
Prerequisites
Tools
I am using macOS, so will be using the brew package manager to install and manage my tools, if you are using Linux or Windows, use the appropriate install guide for each tool, according to your OS.
For each tool I will list the brew install command and the link to the install instructions for other OSes.
- brew
- Powershell -
brew tap caskroom/cask && brew cask install powershell - PowerCLI -
pwshthenInstall-Module -Name VMware.PowerCLI -Scope CurrentUser - govc -
brew tap govmomi/tap/govc && brew install govmomi/tap/govc
Resources
We are going to need the Ubuntu 18.04 LTS Cloud image OVA from Canonical’s repo downloaded to our local machine in order to extract the OVF specifications from it, the OVA can be found here:
Setup
With the OVA downloaded, we need to configure a few variables for govc to connect to our vCenter, handily, rather than having to define them on the CLI for every command, we can just export them as variables to our current shell.
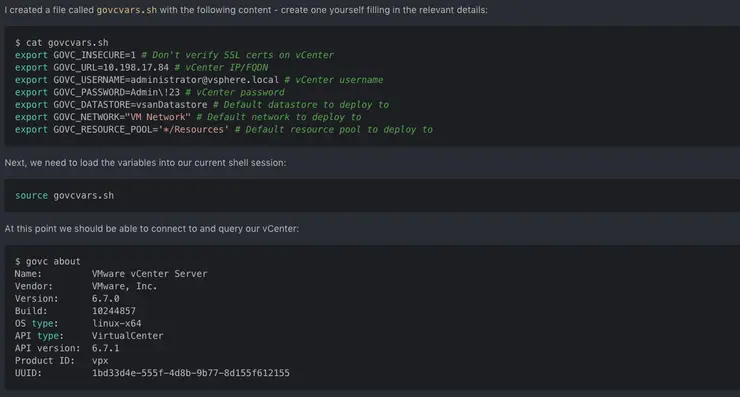
I created a file called govcvars.sh with the following content - create one for yourself filling in the relevant details:
$ cat govcvars.sh
export GOVC_INSECURE=1 # Don't verify SSL certs on vCenter
export GOVC_URL=10.198.17.84 # vCenter IP/FQDN
export GOVC_USERNAME=administrator@vsphere.local # vCenter username
export GOVC_PASSWORD=Admin\!23 # vCenter password
export GOVC_DATASTORE=vsanDatastore # Default datastore to deploy to
export GOVC_NETWORK="VM Network" # Default network to deploy to
export GOVC_RESOURCE_POOL='*/Resources' # Default resource pool to deploy to
Next, we need to load the variables into our current shell session:
source govcvars.sh
At this point we should be able to connect to and query our vCenter:
$ govc about
Name:         VMware vCenter Server
Vendor:       VMware, Inc.
Version:      6.7.0
Build:        10244857
OS type:      linux-x64
API type:     VirtualCenter
API version:  6.7.1
Product ID:   vpx
UUID:         1bd33d4e-555f-4d8b-9b77-8d155f612155
Building the image
Extract the OVF spec from the OVA
Use govc to pull the OVF spec from the Ubuntu OVA we just downloaded, for customisation (this will output the spec to a file in your current directory called ubuntu.json):
govc import.spec ~/Downloads/ubuntu-18.04-server-cloudimg-amd64.ova | python -m json.tool > ubuntu.json
Customise the OVF spec
I changed hostname, public-keys, Password, Network and Name. It is necessary to set public-keys as Ubuntu cloud images (which the OVAs are) only allow SSH key auth from first-boot - no password-only auth.
You can get your SSH public key by running cat ~/.ssh/id_rsa.pub - note if you run this command and you don’t get an output - you probably need to generate an SSH key with ssh-keygen.
$ cat ubuntu.json
{
    "DiskProvisioning": "thin",
    "IPAllocationPolicy": "dhcpPolicy",
    "IPProtocol": "IPv4",
    "PropertyMapping": [
        {
            "Key": "instance-id",
            "Value": "id-ovf"
        },
        {
            "Key": "hostname",
            "Value": "Ubuntu1804Template"
        },
        {
            "Key": "seedfrom",
            "Value": ""
        },
        {
            "Key": "public-keys",
            "Value": "ssh-rsa [[[[[YOUR PUBLIC KEY]]]] mylesg@vmware.com"
        },
        {
            "Key": "user-data",
            "Value": ""
        },
        {
            "Key": "password",
            "Value": "VMware1!"
        }
    ],
    "NetworkMapping": [
        {
            "Name": "VM Network",
            "Network": "VM Network"
        }
    ],
    "MarkAsTemplate": false,
    "PowerOn": false,
    "InjectOvfEnv": false,
    "WaitForIP": false,
    "Name": "Ubuntu1804Template"
}
Deploy the OVA
Deploy the OVA with the customised OVF spec (you can pass the OVA URL to the below command instead of the file on your system, but it will first download to your local computer, then upload to the vCenter, it doesn’t hand off the download operation so is no faster).
govc import.ova -options=ubuntu.json ~/Downloads/ubuntu-18.04-server-cloudimg-amd64.ova
Change the VM size to 4 vCPUs, 4GB RAM, 60GB disk and set the disk.enableUUID=1 flag (needed for disk identification from the vSphere Cloud Provider in Kubernetes)
govc vm.change -vm Ubuntu1804Template -c 4 -m 4096 -e="disk.enableUUID=1"
govc vm.disk.change -vm Ubuntu1804Template -disk.label "Hard disk 1" -size 60G
Power on the VM
govc vm.power -on=true Ubuntu1804Template
Customise the VM for templating
Get the VM’s IP address in order to SSH to it:
$ watch -n 10 govc vm.info Ubuntu1804Template
Name:           Ubuntu1804Template
  Path:         /vSAN-DC/vm/Discovered virtual machine/Ubuntu1804Template
  UUID:         42392966-8d21-ceda-5f23-28584c18703b
  Guest name:   Ubuntu Linux (64-bit)
  Memory:       1024MB
  CPU:          2 vCPU(s)
  Power state:  poweredOn
  Boot time:    2019-01-25 18:28:21.978093 +0000 UTC
  IP address:   10.198.17.85
  Host:         10.198.17.31
SSH to the new guest VM (should auth automatically as you put in your SSH key above in the OVF spec) - you will be prompted to change your password:
ssh ubuntu@10.198.17.85
SSH to the box again to re-auth and update apt
ssh ubuntu@10.198.17.85
sudo apt update
sudo apt install open-vm-tools -y
sudo apt upgrade -y
sudo apt autoremove -y
We are going to disable cloud-init and instead rely on VMware Guest Customisation specs:
# cleans out all of the cloud-init cache, disable and remove cloud-init customisations
sudo cloud-init clean --logs
sudo touch /etc/cloud/cloud-init.disabled
sudo rm -rf /etc/netplan/50-cloud-init.yaml
sudo apt purge cloud-init -y
sudo apt autoremove -y
We have to disable a few startup params and adjust the open-vm-tools startup order to allow customisation to work:
# Don't clear /tmp
sudo sed -i 's/D \/tmp 1777 root root -/#D \/tmp 1777 root root -/g' /usr/lib/tmpfiles.d/tmp.conf

# Remove cloud-init and rely on dbus for open-vm-tools
sudo sed -i 's/Before=cloud-init-local.service/After=dbus.service/g' /lib/systemd/system/open-vm-tools.service
Cleanup the VM for templating
# cleanup current ssh keys so templated VMs get fresh key
sudo rm -f /etc/ssh/ssh_host_*

# add check for ssh keys on reboot...regenerate if neccessary
sudo tee /etc/rc.local >/dev/null <<EOL
#!/bin/sh -e
#
# rc.local
#
# This script is executed at the end of each multiuser runlevel.
# Make sure that the script will "" on success or any other
# value on error.
#
# In order to enable or disable this script just change the execution
# bits.
#

# By default this script does nothing.
test -f /etc/ssh/ssh_host_dsa_key || dpkg-reconfigure openssh-server
exit 0
EOL

# make the script executable
sudo chmod +x /etc/rc.local

# cleanup apt
sudo apt clean

# reset the machine-id (DHCP leases in 18.04 are generated based on this... not MAC...)
echo "" | sudo tee /etc/machine-id >/dev/null

# disable swap for K8s
sudo swapoff --all
sudo sed -ri '/\sswap\s/s/^#?/#/' /etc/fstab

# cleanup shell history and shutdown for templating
history -c
history -w
sudo shutdown -h now
Mark the VM as a template
Mark the VM as a template to so you can clone from it in vSphere:
govc vm.markastemplate Ubuntu1804Template
Define a VM Guest Customisation spec
VM Guest Customisation specs can’t be created from govc right now see here ↗ for details - I have submitted some documentation for this features, so hopefully in future we won’t need PowerShell or PowerCLI at all.
Start up PowerShell and create a guest customisation spec
pwsh
> Connect-VIServer 10.198.17.160 -User administrator@vsphere.local -Password Admin!23
> New-OSCustomizationSpec -Name Ubuntu -OSType Linux -DnsServer 10.198.16.1,10.198.16.2 -DnsSuffix satm.eng.vmware.com -Domain satm.eng.vmware.com -NamingScheme vm

Name                                         Description Type          OSType  LastUpdate           Server
----                                         ----------- ----          ------  ----------           ------
Ubuntu                                                   Persistent    Linux   27/01/2019 21:43:40  10.198.17.160

> exit
Deploy some clones
Clone the Kubernetes VMs from this template using the Ubuntu customisation spec we just defined in order to customise the VM name, domain, DNS, etc.
govc vm.clone -vm Ubuntu1804Template -customization=Ubuntu  k8s-master
govc vm.clone -vm Ubuntu1804Template -customization=Ubuntu  k8s-worker1
govc vm.clone -vm Ubuntu1804Template -customization=Ubuntu  k8s-worker2
govc vm.clone -vm Ubuntu1804Template -customization=Ubuntu  k8s-worker3
In a new terminal, watch for the VM IP addresses (refreshes every 30 seconds):
watch -n 30 "govc find / -type m -name 'k8s*' | xargs govc vm.info | grep 'Name:\|IP'"
End
That’s it - you now have a base Ubuntu 18.04 LTS Cloud template to clone from - and as a bonus we’ve deployed four VMs from it for use in a Kubernetes cluster as part of the next chapter!
Why not follow @mylesagray on Twitter ↗ for more like this!