This isn’t necessarily a follow-on from the other three blogs so far in this series, but more of an alternative to parts one and two. Following on from those I felt that the process could be much more automated, and less “ssh into every box and change things manually”. After all, the less changes we can make iteratively and imperatively ↗, the more it is programmed or declarative, the better.
This blog is one way to do that - I expect to have two or three more methods blogged in the near future that will offer futher options - with a particular focus on day-2.
So what are we doing this time, and how is it different?
There is a package called cloud-init that comes by default on “cloud images ↗” of most Linux operating systems these days, it’s purpose is to do day-0 setup of operating systems, things like package installations, repository setup, SSH key additions, writing out to files and running arbitrary shell commands at first boot.
With that in mind, cloud-init covers basically everything we did in the first part of the series and most of the second, it’s much quicker and much more scalable, and quite recently VMware Tools added support for using cloud-init as it’s customisation engine as an alternative to the default perl scripting, this means we can deploy one VM template ↗ to vSphere and use the built in cloning and customisations specs ↗ in vSphere to add networking and hostnames to the new VMs.
cloud-init relies, for our purposes, on one file called user-data - but can also include a meta-data file, but that is handled in vSphere’s case by the customisation specs.
Prerequisites
Tools
I am using macOS, so will be using the brew package manager to install and manage my tools, if you are using Linux or Windows, use the appropriate install guide for each tool, according to your OS.
For each tool I will list the brew install command and the link to the install instructions for other OSes.
- brew
- kubectl -
brew install kubernetes-cli - Powershell -
brew tap caskroom/cask && brew cask install powershell - PowerCLI -
pwshthenInstall-Module -Name VMware.PowerCLI -Scope CurrentUser - govc -
brew tap govmomi/tap/govc && brew install govmomi/tap/govc
Resources
Just like in part one, we are going to need the Ubuntu 18.04 LTS Cloud image OVA from Canonical’s repo downloaded to our local machine in order to extract the OVF specifications from it, the OVA can be found here:
Setup
govc
With the OVA downloaded, we need to configure a few variables for govc to connect to our vCenter, handily, rather than having to define them on the CLI for every command, we can just export them as variables to our current shell.
I created a file called govcvars.sh with the following content - create one for yourself filling in the relevant details:
$ cat govcvars.sh
export GOVC_INSECURE=1 # Don't verify SSL certs on vCenter
export GOVC_URL=10.198.16.4 # vCenter IP/FQDN
export GOVC_USERNAME=administrator@vsphere.local # vCenter username
export GOVC_PASSWORD=P@ssw0rd # vCenter password
export GOVC_DATASTORE=vsanDatastore # Default datastore to deploy to
export GOVC_NETWORK="Cluster01-LAN-1-Routable" # Default network to deploy to
export GOVC_RESOURCE_POOL='cluster01/Resources' # Default resource pool to deploy to
export GOVC_DATACENTER=DC01 # I have multiple DCs in this VC, so i'm specifying the default here
Next, we need to load the variables into our current shell session:
source govcvars.sh
At this point we should be able to connect to and query our vCenter:
$ govc about
Name:         VMware vCenter Server
Vendor:       VMware, Inc.
Version:      6.7.0
Build:        13639324
OS type:      linux-x64
API type:     VirtualCenter
API version:  6.7.2
Product ID:   vpx
UUID:         dc0eaa5c-3460-49ef-aeb2-09e886ad333a
Extract the image spec
Extract the OVF spec from the OVA
Use govc to pull the OVF spec from the Ubuntu OVA we just downloaded, for customisation (this will output the spec to a file in your current directory called ubuntu.json):
govc import.spec ~/Downloads/ubuntu-18.04-server-cloudimg-amd64.ova | python -m json.tool > ubuntu.json
Customise the OVF spec
This is where we diverge from part one, we are going to fill in only two fields here and the rest will be encoded in our user-data file that we’ll get to in a bit.
Below, I only changed three things; hostname, Network and Name. These correlate to the in-guest name of the VM, the vSphere Port Group the VM will be attached to for networking on deployment, and the name of the VM when deployed (note: this is not the hostname of the VM, just the VM name itself).
Note, I have just cleared the hostname value, this is important and will be populated later by the vSphere customisation spec at clone-time.
$ cat ubuntu.json
{
    "DiskProvisioning": "thin",
    "IPAllocationPolicy": "dhcpPolicy",
    "IPProtocol": "IPv4",
    "PropertyMapping": [
        {
            "Key": "instance-id",
            "Value": "id-ovf"
        },
        {
            "Key": "hostname",
            "Value": ""
        },
        {
            "Key": "seedfrom",
            "Value": ""
        },
        {
            "Key": "public-keys",
            "Value": ""
        },
        {
            "Key": "user-data",
            "Value": ""
        },
        {
            "Key": "password",
            "Value": ""
        }
    ],
    "NetworkMapping": [
        {
            "Name": "VM Network",
            "Network": "Cluster01-LAN-1-Routable"
        }
    ],
    "MarkAsTemplate": false,
    "PowerOn": false,
    "InjectOvfEnv": false,
    "WaitForIP": false,
    "Name": "Ubuntu1804Template"
}
With that set up, it’s time to start building out our user-data file which does the bulk of the operating system setup and prep.
Building the user-data file
cloud-init has a very rich set of built-in supported primitives for OS setup, you can see a mostly complete list here ↗ (it is also extensible via plugins).
A note before we get into this - “cloud-images” are not meant to be logged into with a password ever, you are expected to use SSH public-key authentication. So you will need to grab your SSH public key for the upcoming work.
You can get your SSH public key by running cat ~/.ssh/id_rsa.pub - note if you run this command and you don’t get an output - you probably need to generate an SSH key with ssh-keygen.
All of the below sections should be added to a single file called user-data on your local system, we will be encoding it as a single entity later on, but as you follow, just keep appending all the sections together in that one file.
Setting up users and groups
user-data is entirely written in yaml, so spacing and indentation is critical here.
The below snippet is actually very simple, it adds a group to the OS called docker and changes the default user ubuntu to add a trusted SSH public key, as well as add it to the sudo group with no-password escalation, adds the user to the docker group that was just created and sets the default shell for the user to bash.
Note, you can add multiple SSH keys to a user for login (say if you have two laptops) by simply adding another line item under the ssh-authorized-keys key.
This is where you would want to take the output of cat ~/.ssh/id_rsa.pub and insert it into the code - you can see the SSH public key for my laptop below as an example.
groups:
  - docker
users:
  - default
  - name: ubuntu
    ssh-authorized-keys:
      - ssh-rsa AAAAB3NzaC1yc2EAAAADAQABAAACAQDcxQcNS5vzxHn2sdHHw/nTHWiME5OWv1i3cvMdqMUWKhPSv7uHCTz3Q4kot8UvdD/jIDOktIpDlayVeXkxAuMzIB0lbVEku1mjLyDQ0syGVSAvj4BkH2uLp0Hybc97U0PQHYgLy60d2l8c96qajPHxRmDYRKbCQaNxQeafxwlQUzr615RvzjOgt5v7zhdZ+V5pIDH2Amf/rRiPrq0NLTYShpoRwtFeS4bQtG5mHfDDvzg+Jh1Sxt63oB0AGy0ORv7GzSDlqraFADxOwFnKz0/fbVKeauFCFXRKrral+PSRgbr39cVJHykaYVDw9D3nKMZqDKITRXAJiWAEES91yk6nikAwgyXup+wpiymMmgUq60ASHgpTqWbtPdEZAsjtlhJXSDit+iWS1yrdLg5ayza8PAr5YijT0g+xMkJXudxgGOr913Oty04Fxk61n3kcjadsbt5hjc3QWxK0Rj0jJK9HwV2sn8lHVdvSfwOkgZLH7WH4E2IBGQVm+4Cd8RLMsAev5tnWGIiSLl2uRi63+mKwynIriSAAdWurrs11Q36qYrdwPK2XXq/MvUcTnm3yXSLjeSLWMmdoyqiLqxerOiBcMRbTwvVwfe73UJXdLPbfA0xqAB/gTg2NxmcAI/F3OEWMRM4/PsqPS2t/VAL993OdSshHGtT30AP86G+vuHuecw== mylesg@vmware.com
    sudo: ALL=(ALL) NOPASSWD:ALL
    groups: sudo, docker
    shell: /bin/bash
Adding apt repositories and installing packages
Next up, as we’re making a base image for Kubernetes cluters, we are going to add two repositories - one for Kubernetes and one for Docker. I found the easiest way to add them is by using the keyid rather than the GPG key in it’s entirety, it’s much smaller and less error prone.
The documentation for each module is here: apt ↗, package_upgrade, packages ↗.
To briefly go over what’s happening below: we are adding the two repositories for K8s and Docker to apt and trusting them by adding the GPG key ids for each. Next up, we tell the OS to upgrade all packages on boot and finally, we tell the OS to install four packages; kubelet, kubectl, kubeadm and docker-ce at specific target versions (in this case, for K8s v1.14.2 and the supported Docker runtime version).
The neat thing about this is, if you ever want to change the base packages that come on your OS (like when kubernetes or docker get upgraded) - you would simply update the version strings next to each package and deploy the OVA again with the new spec attached, rather than having to rebuild an image manually and in its entirety via SSH.
apt:
  sources:
    kubernetes:
      source: "deb http://apt.kubernetes.io/ kubernetes-xenial main"
      keyserver: "hkp://keyserver.ubuntu.com:80"
      keyid: BA07F4FB
    docker:
      arches: amd64
      source: "deb https://download.docker.com/linux/ubuntu bionic stable"
      keyserver: "hkp://keyserver.ubuntu.com:80"
      keyid: 0EBFCD88
package_upgrade: true
packages:
  - [kubelet, 1.14.3-00]
  - [kubectl, 1.14.3-00]
  - [kubeadm, 1.14.3-00]
  - [docker-ce, '5:18.09.6~3-0~ubuntu-bionic']
Writing the kubeadm and vsphere.conf template files
This section may look unwieldy and complex, but it’s actually one of the simplest to understand. In this instance we are using the write_files module ↗ and specifying a file path as well as the content to go inside that file, simple!
There are four files in total here:
The first one /etc/docker/daemon.json to create the Docker daemon config as-per the K8s docs ↗.
Next up, /etc/kubernetes/kubeadminitmaster.yaml for the kubeadm master initialisation where we specify things like the token to use for cluster membership and kubeadm join operations, the K8s version to install, the cloud-provider name and config location as well as the pod networking overlay subnet. For further explaination on these, check out my previous article on this.
The third file is /etc/kubernetes/kubeadminitworker.yaml which tells the worker nodes how to join the K8s cluster, by specifying the same token as in the last file, the same cloud-provider configuration and introduces the discovery.yaml file, which tells the workers what IP address to access the master on and what credentials to use to log into it (more on that in a little bit).
Up to this point, you could have copied and pasted the below config verbatim with zero ill-effect. The fourth file however, requires a little customisation. This is the cloud-provider config file for the vSphere Cloud Provider and you’ll need to fill in your own environment details here. It will live at /etc/kubernetes/vsphere.conf.
You’ll probably notice that the config looks almost identical as the govcvars.sh file from above, and that’s because it’s the same environment! So fill this section in with details like your vCenter IP, username, password, Datacenter name, Resource pool and network. A full rundown of the config options can be found here ↗.
write_files:
  - content: |
        {
          "exec-opts": ["native.cgroupdriver=systemd"],
          "log-driver": "json-file",
          "log-opts": {
            "max-size": "100m"
          },
          "storage-driver": "overlay2"
        }
    path: /etc/docker/daemon.json
  - content: |
        apiVersion: kubeadm.k8s.io/v1beta1
        kind: InitConfiguration
        bootstrapTokens:
              - groups:
                - system:bootstrappers:kubeadm:default-node-token
                token: y7yaev.9dvwxx6ny4ef8vlq
                ttl: 0s
                usages:
                - signing
                - authentication
        nodeRegistration:
          kubeletExtraArgs:
            cloud-provider: "vsphere"
            cloud-config: "/etc/kubernetes/vsphere.conf"
        ---
        apiVersion: kubeadm.k8s.io/v1beta1
        kind: ClusterConfiguration
        kubernetesVersion: v1.14.3
        apiServer:
          extraArgs:
            cloud-provider: "vsphere"
            cloud-config: "/etc/kubernetes/vsphere.conf"
          extraVolumes:
          - name: cloud
            hostPath: "/etc/kubernetes/vsphere.conf"
            mountPath: "/etc/kubernetes/vsphere.conf"
        controllerManager:
          extraArgs:
            cloud-provider: "vsphere"
            cloud-config: "/etc/kubernetes/vsphere.conf"
          extraVolumes:
          - name: cloud
            hostPath: "/etc/kubernetes/vsphere.conf"
            mountPath: "/etc/kubernetes/vsphere.conf"
        networking:
          podSubnet: "10.244.0.0/16"
    path: /etc/kubernetes/kubeadminitmaster.yaml
  - content: |
        apiVersion: kubeadm.k8s.io/v1beta1
        discovery:
          file:
            kubeConfigPath: discovery.yaml
          timeout: 5m0s
          tlsBootstrapToken: y7yaev.9dvwxx6ny4ef8vlq
        kind: JoinConfiguration
        nodeRegistration:
          kubeletExtraArgs:
            cloud-provider: vsphere
    path: /etc/kubernetes/kubeadminitworker.yaml
  - content: |
           [Global]
            user = "administrator@vsphere.local"
            password = "P@ssw0rd"
            port = "443"
            insecure-flag = "1"

            [VirtualCenter "10.198.16.4"]
            datacenters = "DC01"

            [Workspace]
            server = "10.198.16.4"
            datacenter = "DC01"
            default-datastore = "vsanDatastore"
            resourcepool-path = "cluster01/Resources"
            folder = "k8s"

            [Disk]
            scsicontrollertype = pvscsi

            [Network]
            public-network = "Cluster01-LAN-1-Routable"
    path: /etc/kubernetes/vsphere.conf
Some system-prep commands and housekeeping
Because the system is going to be booted once on import to set up VMware Tools and customisation specs - we need to run a few commands to clean up any uniqueness in the OS as well as set up some K8s-specific pre-requisites.
Running arbitrary commands
The below runcmd module ↗ allows us to use cloud-init to run commands on the OS boot, they usually run last in the chain after the other modules.
To run through them in order we are:
- Turning off Swap on the OS
- Persisting the
swapoffoperation by removing it from the filesystem mounts - Creating a Docker daemon
systemdfile location - Reloading the
systemdconfig files - Restarting the
dockerservice - Allowing IPv4 bridge traffic to traverse
iptables(required by most CNIs ↗) - Allowing IPv6 bridge traffic to traverse
iptables(required by most CNIs ↗) - Enabling vSphere customiation to call
cloud-init- reference ↗ - Don’t clear
/tmpon reboot for customisation - reference ↗ - Clear the
machine-idto ensure the cloned VMs get unique IDs and IP addresses ↗.
With all the commands run, we post a final_message ↗ to state the system is prepped and how long it took.
And finally, we shutdown the VM via the power_state module ↗ when everything is run, allowing a max of 30s for processes to terminate.
runcmd:
  - swapoff --all
  - sed -ri '/\sswap\s/s/^#?/#/' /etc/fstab
  - mkdir -p /etc/systemd/system/docker.service.d
  - systemctl daemon-reload
  - systemctl restart docker
  - sysctl net.bridge.bridge-nf-call-iptables=1
  - sysctl net.bridge.bridge-nf-call-ip6tables=1
  - 'echo "disable_vmware_customization: false" >> /etc/cloud/cloud.cfg'
  - sed -i 's/D \/tmp 1777 root root -/#D \/tmp 1777 root root -/g' /usr/lib/tmpfiles.d/tmp.conf
  - echo -n > /etc/machine-id
final_message: "The system is prepped, after $UPTIME seconds"
power_state:
  timeout: 30
  mode: poweroff
With your user-data fully built, if you like you can validate it using the Ubuntu cloud-init tool as below - this step is optional, but it’s worth doing to make sure it parses correctly:
cloud-init devel schema --config-file my-user-data-file.txt
Encoding the data and deploying the template
Now that our full user-data file is built (full example here ↗) we need to encode it in base64 to allow us to put it into the ubuntu.json file at the start (almost forgot about that, didn’t ya?).
Encoding with base64
This is very easy, to verify it gets encoded properly, we’ll run a decode and the output should be the same as your user-data file - spacing and all.
base64 user-data | base64 -D # Note - on Linux it's lowercase -d
If all is well, run it again without the decode and copy the base64 encoded string it outputs:
base64 user-data
Adding the base64 to ubuntu.json
With the output from above copied, paste it into the user-data section of the ubuntu.json file in the Value field. You can see my finished ubuntu.json example here ↗.
It essentially looks something like this (but a lot longer):
        {
            "Key": "user-data",
            "Value": "I2Nsb3VkLWNvbmZpZwpjaHBhc3N3ZDoKICAgIGxpc3Q6IHwKICAgICAgdWJ1bnR1OlZNd2FyZTEhCiAgICBleHBpcmU6IGZh...Y29uZHMiCnBvd2VyX3N0YXRlOgogIHRpbWVvdXQ6IDMwCiAgbW9kZTogcG93ZXJvZmY="
        },
Deploy the template VM
Now that the ubuntu.json is complete and includes all our user-data options encoded in base64, it’s time to deploy the template VM all the other will be cloned from.
Import the OVA
Deploy the OVA with the spec attached:
govc import.ova -options=ubuntu.json ~/Downloads/ubuntu-18.04-server-cloudimg-amd64.ova
Note: When deploying you’ll see this output, that is expected and can be safely ignored:
Warning: Line 107: Unable to parse 'enableMPTSupport' for attribute 'key' on element 'Config'.
Update the VM to have a larger disk and more CPUs and RAM:
govc vm.change -vm Ubuntu1804Template -c 4 -m 4096 -e="disk.enableUUID=1"
govc vm.disk.change -vm Ubuntu1804Template -disk.label "Hard disk 1" -size 60G
Power on the VM and allow customisation to run (it’ll auto-shut down when done, as we specified in user-data) this should take around 3-4 minutes, maximum:
govc vm.power -on=true Ubuntu1804Template
Wait for the VM to shut down and mark the VM as a template for cloning:
until govc vm.info -json Ubuntu1804Template | jq -r '.VirtualMachines[].Runtime.PowerState' | grep -q  "poweredOff"; do sleep 5; done
govc vm.markastemplate Ubuntu1804Template
vSphere customisation spec
At this point we need to create our vSphere Customisation Spec we talked about at the start, this is very simple and currently requires PowerShell and PowerCLI, but this functionality may get included in govc if there is enough interest ↗.
Start up PowerShell and create a guest customisation spec
pwsh
I am connecting to my vCenter from above, creating a customisation spec called Ubuntu and using my internal DNS servers as well as domain name and setting the hostname to be the same as the VM name (advised) - but customise whichever way you see fit:
> Connect-VIServer 10.198.16.4 -User administrator@vsphere.local -Password P@ssw0rd
> New-OSCustomizationSpec -Name Ubuntu -OSType Linux -DnsServer 10.198.16.1,10.198.16.2 -DnsSuffix satm.eng.vmware.com -Domain satm.eng.vmware.com -NamingScheme vm

Name                                         Description Type          OSType  LastUpdate           Server
----                                         ----------- ----          ------  ----------           ------
Ubuntu                                                   Persistent    Linux   27/01/2019 21:43:40  10.198.17.160

> exit
Deploy some VMs
With that done, we can now clone as we see fit.
I’d recommend you deploy a test VM first, just to make sure the customisation works as you expect - if not, see my “Troubleshooting” section at the bottom of this blog.
govc vm.clone -vm Ubuntu1804Template -customization=Ubuntu customisation-test
I’m going to create a single master and three workers by specifying the template VM and the vSphere customisation spec we just defined above. The last command will check for IP addresses for the new nodes every 10 seconds:
govc vm.clone -vm Ubuntu1804Template -customization=Ubuntu k8s-master01
govc vm.clone -vm Ubuntu1804Template -customization=Ubuntu k8s-worker01
govc vm.clone -vm Ubuntu1804Template -customization=Ubuntu k8s-worker02
govc vm.clone -vm Ubuntu1804Template -customization=Ubuntu k8s-worker03
watch -n 10 "govc find / -type m -name 'k8s*' | xargs govc vm.ip -a -v4 -wait 10m"
Move the VMs into a folder
Let’s move the VMs into the folder that was specified in the vsphere.conf above, for cleanliness. You’ll need to adjust this to match your datacenter and folder names:
govc folder.create /DC01/vm/k8s
govc object.mv /DC01/vm/k8s-\* /DC01/vm/k8s
Run kubeadm
Now that the VMs are deployed, we can SSH into them and set up K8s. At this point the setup is basically identical to the “Initialising the clusterwith kubeadm” sectino of part two of the series, but i’ve condensed the outputs and included the broad steps here for brevity.
Initialise the master
First, SSH into the master node (on whatever IP you got from above):
ssh ubuntu@10.198.25.84
Run the kubeadm initialisation using the file that was part of our user-data:
sudo kubeadm init --config /etc/kubernetes/kubeadminitmaster.yaml
Import the kubeconfig file from the master:
mkdir -p $HOME/.kube
sudo cp -i /etc/kubernetes/admin.conf $HOME/.kube/config
sudo chown $(id -u):$(id -g) $HOME/.kube/config
Ensure the master initialised:
$ kubectl get nodes -o wide
NAME           STATUS   ROLES    AGE   VERSION   INTERNAL-IP    EXTERNAL-IP    OS-IMAGE             KERNEL-VERSION      CONTAINER-RUNTIME
k8s-master01   Ready    master   14m   v1.14.3   10.198.25.84   10.198.25.84   Ubuntu 18.04.2 LTS   4.15.0-51-generic   docker://18.9.6
Deploy flannel pod overlay networking so the pods can communicate with each other.
kubectl apply -f https://raw.githubusercontent.com/coreos/flannel/bc79dd1505b0c8681ece4de4c0d86c5cd2643275/Documentation/kube-flannel.yml
Check to make sure the pods are all in the status Running:
$ kubectl get pods --all-namespaces
NAMESPACE     NAME                                   READY   STATUS    RESTARTS   AGE
kube-system   coredns-fb8b8dccf-jwrr9                1/1     Running   0          12m
kube-system   coredns-fb8b8dccf-ktqf4                1/1     Running   0          12m
kube-system   etcd-k8s-master01                      1/1     Running   0          11m
kube-system   kube-apiserver-k8s-master01            1/1     Running   0          11m
kube-system   kube-controller-manager-k8s-master01   1/1     Running   0          11m
kube-system   kube-flannel-ds-amd64-d8fhm            1/1     Running   0          77s
kube-system   kube-proxy-kfmbr                       1/1     Running   0          12m
kube-system   kube-scheduler-k8s-master01            1/1     Running   0          11m
Export the master node config used to point the workers being joined to the master:
kubectl -n kube-public get configmap cluster-info -o jsonpath='{.data.kubeconfig}' > discovery.yaml
On your laptop
Copy the discovery.yaml to your local machine with scp.
scp ubuntu@10.198.25.84:~/discovery.yaml discovery.yaml
Then upload it to the worker nodes.
scp discovery.yaml ubuntu@10.198.25.92:~/discovery.yaml
scp discovery.yaml ubuntu@10.198.25.93:~/discovery.yaml
scp discovery.yaml ubuntu@10.198.25.94:~/discovery.yaml
Join the workers to the cluster
SSH into each worker node and run the following to join them to the K8s cluster:
sudo kubeadm join --config /etc/kubernetes/kubeadminitworker.yaml
Verify setup
Back on the master node, check that all nodes have joined the cluster:
ubuntu@k8s-master01:~$ kubectl get nodes -o wide
NAME           STATUS   ROLES    AGE   VERSION   INTERNAL-IP    EXTERNAL-IP    OS-IMAGE             KERNEL-VERSION      CONTAINER-RUNTIME
k8s-master01   Ready    master   20m   v1.14.3   10.198.25.84   10.198.25.84   Ubuntu 18.04.2 LTS   4.15.0-51-generic   docker://18.9.6
k8s-worker01   Ready    <none>   61s   v1.14.3   10.198.25.92   10.198.25.92   Ubuntu 18.04.2 LTS   4.15.0-51-generic   docker://18.9.6
k8s-worker02   Ready    <none>   61s   v1.14.3   10.198.25.93   10.198.25.93   Ubuntu 18.04.2 LTS   4.15.0-51-generic   docker://18.9.6
k8s-worker03   Ready    <none>   61s   v1.14.3   10.198.25.94   10.198.25.94   Ubuntu 18.04.2 LTS   4.15.0-51-generic   docker://18.9.6
Verify the providerID is set on all the nodes for the VCP to operate correctly:
ubuntu@k8s-master01:~$ kubectl describe nodes | grep "ProviderID"
ProviderID:                  vsphere://421cb10a-b42b-dedc-a4ba-ff772488c565
ProviderID:                  vsphere://421ca947-60a0-464d-ba72-996fc96c6c92
ProviderID:                  vsphere://421c9702-358e-8253-0c21-faac1e95748b
ProviderID:                  vsphere://421cb1a3-946d-b7b6-9286-1d021a0b7ba4
Detatch the OVFSpec ISO
An interesting tidbit is that when using cloud-init through OVF properties, a small ISO is mounted into each VM that contains the spec itself, this needs to be disconnected before any reboots to avoid double-prepping and hostname resets on reboot.
Eject the OVF ISO:
govc device.cdrom.eject -vm  k8s-master01
govc device.cdrom.eject -vm  k8s-worker01
govc device.cdrom.eject -vm  k8s-worker02
govc device.cdrom.eject -vm  k8s-worker03
In a separate terminal run this to force the eject:
govc vm.question -vm k8s-master01 -answer 0
govc vm.question -vm k8s-worker01 -answer 0
govc vm.question -vm k8s-worker02 -answer 0
govc vm.question -vm k8s-worker03 -answer 0
Conclusion
So there we have the second of two methods for VM templating on vSphere - this one is much more prescriptive, scalable and easier to operationalise and we’ve gone from nothing to a K8s cluster in this single blog post.
Go on to part three of the series here and deploy some apps!
Troubleshooting
I learned a LOT about OS customisation during this exercise, a lot of it I didn’t want to know. However, most importantly I learned how to troubleshoot it. So below are a few places you can look for guidance when something isn’t working.
VMware Guest OS Customisation
Overview
VMware GOSC has two methods for setting up the deployed OS; cloud-init and custom perl scripts that are part of VMTools. cloud-init being the preferred method from now and hence, the existence of this article.
When a VM is cloned via a Customisation Spec as above and with the disable_vmware_customisation: false set in /etc/cloud/cloud.cfg and /tmp set to not clear, as we did in the user-data above, vSphere hands off the details specified in the spec (like VM name, DNS domain, DNS servers) to cloud-init within the guest OS to carry out the customisation making it more reliable and easier to maintain.
vSphere
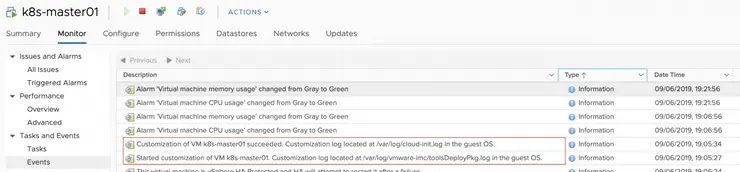
There are a few places to look if your VMs fail to prep correctly, the first of which is in vSphere itself, when the VMs are cloned if they ever come up with their network disconnected and never get an IP, check the Monitor -> Events tab and see what error occurs here. A successful deployment will have the following in the log (a failed one tells you to check the log in the VM):
In-guest
If you are consistently having VMs come up without networks, either not connected to the port group, or no IP (you shouldn’t if you followed the above guide) - throw in your 2c at the following GitHub issue ↗.
Critically: do not change the open-vm-tools systemd unit file ↗ when using cloud-init as the customisation engine (like we are). I got caught up here for days. Don’t repeat my mistakes - this advice is everywhere, including in VMware KBs but is ONLY relevant if using the perl scripts, which we aren’t.
The VMTools customisation log, which handles the handoff of the VMware GOSC spec to cloud-init is located at /var/log/vmware-imc/toolsDeployPkg.log and is very useful if you have customisation problems. I have included a successful log here ↗.
If you see Customization command failed: Failed to create bus connection: No such file or directory in the log, GOSC is using perl instead of cloud-init and is likely either because disable_vmware_customisation: false is not in /etc/cloud/cloud.cfg, or, you edited the open-vm-tools systemd unit file to change the startup order as mentioned above.
cloud-init
cloud-init has a number of tools and logs, but the most useful for debugging will be /var/log/cloud-init-output.log it will tell you what modules ran and whether they were successful for not.
I have found that occasionally, using sudo cloud-init collect-logs and extracting the resulting tar file is very useful for figuring out everything it’s doing.
References
Some extra stuff that really helped me along the course of this learning exercise:
- https://apple.stackexchange.com/a/229457/314650 ↗
- https://serverfault.com/a/922051/74265 ↗
- https://medium.com/@andreidascalu/how-to-test-cloud-init-setup-locally-ae05a2fefcf ↗
Why not follow @mylesagray on Twitter ↗ for more like this!